
Posted on December 8, 2011
Disco Hibrido
 Some weeks ago I read at Matuk.com blog about a hybrid drive from Seagate, that uses a memory module to accelerate the data throughput between the drive and computer, achieving access times very close to SSD’s.
As you may have read earlier in this blog, my experience with SSD has been excellent, at the same time my wife’s computer (with a conventional drive) has become slow. With this in mind, and because “Chip” Torres‘ store is a bit far from me, I drove to CompUSA to buy one.
The cost is reasonable: 500 GB for $ 150, cheaper than a SSD (although I just saw a Kingston SSD/128 for $129) but with enough space for applications and data.
I just format it, and am in the process of installing the Snow Leopard from a USB.
I will continue reporting.
First update: After 8 hours (!) Trying to create a USB with Snow Leopard, I gave up and grabbed my original DVD. For some reason the transfer of a system image to the USB takes more than 10 hours.
Finally I installed the system and transfered files, preferences and applications from the previous hard drive, OSX makes it very easy for the user. Later today I will replace the physical disk to see how it works.
Second update: Success! The disk is installed, and loading times are a little faster, the OS still loads a little slow, but the applications show a big improvement. Apparently the applications will adjust in time. We shall see.
I welcome your questions and comments.
Hace unas semanas leí en Matuk.com acerca de un disco híbrido de Seagate, que usa un módulo de memoria para acelerar los datos entre el disco y la computadora, dando velocidades de acceso cercanas a un SSD.
Como habrán leído anteriormente en este mismo blog, mi experiencia con los SSD ha sido excelente, y la computadora de mi esposa se ha vuelto lenta. Con esto en mente, y como el local del “Chip” Torres me queda un poco lejos, manejé a CompUSA a comprar uno.
El costo es razonable: 500 GB por $150 usd, mas barato que un SSD (aunque acabo de ver un Kingston SSD de 128 por $129) pero con suficiente espacio para aplicaciones y datos.
Acabo de formatearlo, y estoy en el proceso de instalar el Snow Leopard, desde un USB.
Seguiré informando.
Primera actualización: Después de 8 horas (!!) tratando de crear un USB con Snow Leopard, me di por vencido y busqué mi DVD original. Por alguna extraña razón la transferencia de una imagen del sistema al USB tarda mas de 10 horas.
Por fin instalé el sistema e hice una transferencia de archivos, preferencias y aplicaciones del disco anterior, OSX lo hace muy fácil para el usuario. Hoy de tarde reemplazaré el disco físicamente a ver como funciona.
Segunda actualización: ¡Éxito! El disco está instalado, y carga un poco más rápido, el sistema operativo todavía es un poco lento , pero las aplicaciones muestran una gran mejoría. Al parecer con el tiempo se ajusta a las aplicaciones. Veremos.
Espero sus dudas y comentarios.
Posted on December 3, 2011
Proyecto retro: Apple //c
 Some time ago I wrote about retro game emulators for the Apple ][. Recently I started playing with the emulator, recalling the old days it appealed to me to buy an Apple / / c, the first Apple computer I had.
I browsed through eBay for a while and found from very well conserved apple//c’s to units painted green (yikes!). Some of them come with monitor, printer and all of the original items, there are even a couple in their original unopened boxes … incredible.
Then I talked to my old friend Diego, a veteran of the Apple II scene, told him about my project and he clarified some issues of owning a old computer, such as not much support or resources.
I have Not yet decided whether to buy one or not, as it is something that occupies space and is not very useful. However in my research, I found many interesting things:
The used software (original) sold on eBay is very expensive, not less than $30 per program.
The 5 1/4 floppy disks are easy to find, and not very expensive, about $1 per disc.
 A scene of enthusiasts for these computers is very active and there are individuals that maintain and use these computers, there is a long reservoir called “Asimov” (ftp://ftp.apple.asimov.net/pub/apple_II/) where people have uploaded “images” of Apple Disks. You can find everything from original versions to “cracked” with even the pirates’ signatures.
The hardest thing of buying an Apple II this days is to get software, you have to buy old disks or create them again, meaning transfer program “images” back to physical disks.
At first I thought it would be a challenge, but after some searching I found enthusiast communities that are using serial cables and special programs such as Copy II Plus to recreate the floppy disks. After much reading, I found some shops and services specializing in Apple II, One of them, Retrofloppy offers transfer services and sell cables and specially a open source program, already on a 5 1/4 floppy, called ADT, specializing in original floppy transfers directly from a pc to the Apple II via serial cable, I think it saves time and effort.
 After that I found something even more interesting: a hardware device called “Semi Virtual Diskette” (SVD) that emulates three floppy disks inserted into the Apple and other older systems by using a micro controller and some memory.
All this has encouraged me to buy an Apple //c, but I will not invest heavily in something that I can emulate. Anyway, I found all this information interesting and wanted to share with my readers.
Greetings and I hope your comments Hace algún tiempo escribí sobre juegos retro y emuladores de Apple ][. Recientemente estuve jugando con el emulador, recordando los viejos tiempos, se me antojo comprar una Apple //c, el primer ordenador Apple que tuve.
Me fui a eBay y encontré desde computadoras muy bien conservadas hasta las unidades pintadas de verde (ufff!) algunas con monitor, impresora y hasta un par de ellas todavía en las cajas originales que nunca se han abierto … increíble.
Hablando con mi amigo Diego, le hablé de mi proyecto y me aclaro algunos problemas de comprar una vieja computadora, como la falta de apoyo y recursos en caso de descompostura.
Aún no he decidido si comprar o no, es algo que ocupa espacio y no es muy útil. Sin embargo, en mi investigación, he encontrado muchas cosas interesantes que me gustaría compartir:
El software (original) que se vende en eBay es muy caro, no menos de 30 dólares por programa.
Los disquettes de 5 1/4 son fáciles de encontrar, y no muy caros, alrededor de $1 por disco.
Se ha creado toda un ecosistema de fanáticos que se encargan de mantener y utilizar estos equipos, hay una reserva de software llamada “Asimov” (ftp://ftp.apple.asimov.net/pub/apple_II/), donde la gente ha subido “imágenes” de discos Apple ][. Se puede encontrar de todo, desde la versión original al la “Crackeada” con todo y firma de los piratas.
Lo más difícil al comprar un Apple II en estos días es conseguir el software físico, o la forma de transferir los programas de “imágenes” de vuelta a los discos de 5 1/4.
Al principio pensé que sería todo un reto, puesto que para poder crear estos discos se necesita hacer uso de cables seriales y programas especiales, tales como Copiar II Plus para transferir al Apple //c y volver a crearlos. Después de leer mucho, encontré tiendas y servicios especializados en Apple II, y uno de ellos, Retrofloppy, que ofrece servicios de transferencia y venta de cables para diferentes modelos de Aplple II, y sobre todo un programa de código abierto, llamado ADT, que se especializa en transferencias de imagen “DSK” a disquete original directamente. Creo que esto ahorra tiempo y esfuerzo.
Después de eso, he encontrado algo aún más interesante: un hardware llamado SVD que emula tres disquetes insertados en la Apple II, //c y otros sistemas como TRS-80 y TI-994A, usando un micro controlador y chips de memoria.
Todo esto me ha animado a comprar una Apple //c, pero voy a esperar y buscar por opciones económicas, pues no voy a invertir mucho en algo que se puede emular.
Sin embargo el ejercicio de buscar en investigar me pareció interesante y lo quise compartir con mis lectores.
Saludos y espero sus comentarios
Posted on October 17, 2011
Steve Jobs, adios, y gracias por haber hecho facil la tecnologia.
Steve Jobs
1955-2011

Steve Jobs
1955-2011
Posted on July 28, 2011
Emuladores para iPhone
| |
||
 sNES sNES |
||
 Como he estado jugando últimamente con emuladores, he recordado varios juegos que fueron mis favoritos en esos tiempos tan divertidos.
En esos tiempos se conseguían los juegos importándolos de tiendas estadounidenses pero más frecuentemente intercambiando por anuncios en el periódico. Esto es porque en México no existían proveedores de software, mucho menos para apple, y lo poco que había era escaso y caro.
Recuerdo que había un personaje que vivía al norte de la ciudad el cual te llamaba por teléfono e iba a tu casa con cajas de programas para intercambiar – o vender, si no tenías nada que le interesara. Por suerte y gracias a que al comprar m computadora en Estados Unidos, el dueño anterior me “heredó” una colección de programas bastante grande, por lo que de la noche a la mañana me convertí en uno de los poseedores de las colecciones más grandes de la ciudad.
Junto con un gran amigo – Diego, que también tenía gran cantidad de Software – hacíamos reuniones con el famoso personaje e intercambiábamos muchísimos programas cada dos o tres meses.
 Con todo esto, tuve acceso a infinidad de programas que pude usar y disfrutar. Entre mis favoritos estaban Karateka, Donkey Kong, Super Mario, y uno en especial: Hard Hat Mack.
Con esto en mente, estuve jugando en mi Mac un buen tiempo, pero un día esperando en una fila me puse a jugar en mi iPhone, y pensé que sería divertido poder jugar esos juegos en el teléfono.
Me puse a buscar un emulador de Apple ][, pero en primer lugar, Apple no permite emuladores en el AppStore, aunque hay una App llamada “Commodore 64” que en sí es un emulador, pero no permite instalarle mas que algunos programas autorizados.
| |
||
| sNES |
||
Posted on May 29, 2011
Emuladores
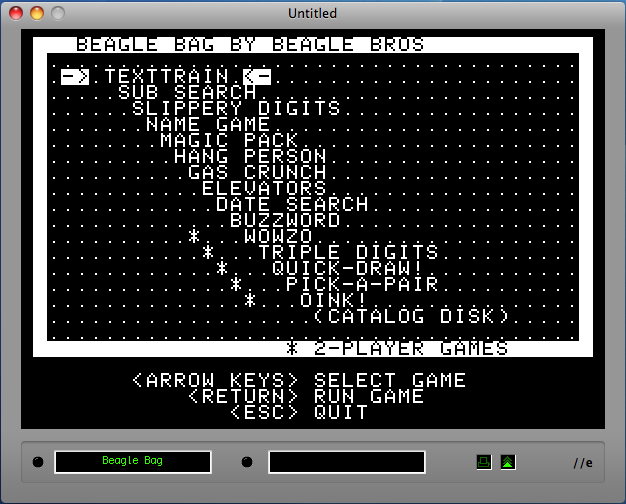
The other day I read a comment from my friend Manuel López about Beagle Bros, a former software company Apple II that was apart from educational, fun, adding humor to their programs, labels and graphics on its packaging and manuals. that brought me good memories of the time used Apple / / c, the first computer “portable” I had. I still have a poster of them, along with the disc and original packaging of one of its programs.
Unfortunately all my original programs for Apple II back home from a friend of youth alienation that I never wanted them back, so I lost all my collection.
With this nostalgia made me want to go back to see the programs and I remembered that I have some Apple II emulators for OSX: Catakig, Virtual] [and OSXII. All require Apple ROM, which you have to get on the net it is illegal to include in the program, for copyright reasons. However, the three are not without bugs or errors.
Catakig – This is the first emulator and it works relatively well, although some disks (floppies images) are not recognized and generate error.


OSXII – is the fastest of all, everything I’ve tried works, and have the option of color or green.

Mac Emulator
After trying these, I remembered that there are some old Macintosh emulators, such as the 512 system 7 and system 9 68040.
MiniVmac – Mac emulator 512, with System 7, runs all the programs I have saved for years, very fast and smooth.

SheepShaver – This emulates the system 9 in color, high resolution, as the Mac IIci, one of my favorite computers of all time.

Emulators allow you to reuse old software, you may retrieve information that otherwise would have been lost, and especially that great nostalgia for the golden age of personal computing that many of us live.
I welcome your comments.
 El otro día leí un comentario de mi amigo Manuel López acerca de Beagle Bros, una antigua empresa de programas para Apple II que era aparte de educativa, muy divertida, al agregar mucho humor a sus programas, etiquetas y gráficos en sus paquetes y manuales. eso me trajo buenos recuerdos de la época en que usaba Apple //c, la primera computadora “portátil” que tuve. Todavía guardo un poster de ellos, junto con el disco y empaque original de uno de sus programas.
Por desgracia todos mis programas originales para Apple II quedaron en casa de un amigo de la juventud, que por distanciamiento nunca me los quiso devolver, por lo que perdí toda mi colección.
Con esa nostalgia me entraron ganas de volver a ver los programas y recordé que tengo algunos emuladores de Apple II para OSX: Catakig, Virtual ][ y OSXII. Todos requieren el ROM de Apple, el cual hay que conseguir en la red pues es ilegal incluirlo en el programa, por razones de derechos de autor. Sin embargo los tres no dejan de tener “bugs” o errores.
Catakig – Este es de los primeros emuladores y funciona relativamente bien, aunque algunos discos (imágenes de floppys) no son reconocidos y generan error.
Virtual ][ – Es el mas divertido, hace los sonidos del drive, pero no todos mis archivos corren.
OSXII – es el mas rápido de todos, todo lo que he probado funciona, y tiene la opción de color o verde.
Emuladores de Mac
Después de probar estos, recordé que existen algunos emuladores de antiguas Macintosh, como sistema 7 de las 512, y sistema 9 de 68040.
MiniVmac – un emulador de Mac 512, con sistema 7, corre todos los programas que he guardado durante años, muy rápido y sin problemas.
SheepShaver – Este emula el sistema 9 a color, en alta resolución, como la Mac IIci, una de mis computadoras favoritas de todos los tiempos.
Estos son los emuladores que tengo instalados. He encontrado una página con ligas a otros emuladores para Mac OSX, tendré que probarlos para ver que tal funciona.
Los emuladores permiten volver a usar programas antiguos, tal vez recuperar información que de otra forma se hubiera perdido, y sobre todo esa gran nostalgia por la época dorada de la computación personal que muchos vivimos.
Espero sus comentarios.
Posted on May 27, 2011
ATV2: el nuevo standard
 Although I have not written because of my work, the new devices keep coming. Now it’s the turn of the Apple TV 2. In one of my previous posts I talk about PLEX, the Home Theater software that turns a Mac mini in a full fledged home media center. you can listen to music, watch videos, TV, and much web content from Netflix to Hulu, YouTube and all online video services.
The problem with Plex is that it requires a fairly powerful and expensive computer (mac mini core2 2.4ghz with 4 GB of RAM) and basically have a mac “wasted” connected to an LCD TV, that you have to turn on by hand and wait for it to boot, or keep it on standby or sleep, while it consumes electricity. This can be replaced with a small and inexpensive device delivers a computer that can be used for business or sold at a good price.
When Apple introduced the new version of its system for home media consumption, what most struck me was its price. $ 99 for a device very small, black, with only very limited and only basic connections in the rear, a top apple logo and a discreet “led” to the front.
Normally ATV2 functionality is pretty basic, restricted to the iTunes store, and consume content focused on Apple computers or local. This type of configuration will not agree with my way of consuming content, so I was not interested. Until finally XBMC.
As mentioned earlier, Plex is a modification of XBMC (Xbox Media Center) started as a “hack” in the first Xbox to turn it into a “Media Center”. Today has been modified to run on multiple platforms, and recently the “Port” to IOS, which runs on ATV2, iPad and iPhone.
A friend told me notice of the availability of this application, which requires having “jailbreak or unlock. after checking (with my friend as a guinea pig) that the program worked much like the Plex, I gave myself the task of getting one, unlock it and install XBMC.
The jailbreak is a little more complicated on this unit because it requires a series of remote control commands (no other mode of control) and a special cable (microUSB) that comes with the computer. After several attempts to stay ready. This thing is complicated and not for the fainthearted or cautious: you have to connect via SSH and type:
$ ssh root@[your ATV2 IP Address]
root@[your ATV2 IP Address]'s password: ''the password is "alpine" by default''

$ apt-get install wget

$ wget -O- http://apt.awkwardtv.org/awkwardtv.pub | apt-key add -

$ echo "deb http://apt.awkwardtv.org/ stable main" > /etc/apt/sources.list.d/awkwardtv.list

$ echo "deb http://mirrors.xbmc.org/apt/atv2 ./" > /etc/apt/sources.list.d/xbmc.list

$ apt-get update

$ apt-get install org.xbmc.xbmc-atv2
 That’s it. Upon reboot, the homepage of Apple TV2, XBMC will appear enabling full functionality. Hence only a matter of configuring the local servers or computers where you have the movies, music and photos.
The interesting thing is that this can be done in the iPhone and iPad (previously released) and turn the device into a portable media viewer, with all the benefits of XBMC on hand. The only drawback is you have to be in a WiFi network, the amount of data to be transmitted, but a high-definition movie looks perfect.
At the end I replace my Mac Mini with Plex for this little gadget, and even sacrificed some visual candy, I have recovered a computer and I have instant-on a device that does not consume even half of energy or space than before.
As always I welcome your comments.
Aunque hace tiempo que no escribía por exceso de trabajo, las novedades continúan. Ahora le toca el turno al Apple TV 2. En una de mis anteriores entradas hable sobre PLEX, el software de Home Theater que convierte una mac mini en todo un sistema de visualización de medios casero. Permite escuchar música, ver vídeos, TV, y mucho contenido de la red, desde Netflix hasta Hulu, pasando por YouTube y todos los servicios de vídeo en linea.
El problema de Plex es que requiere de una computadora bastante poderosa y cara (mac mini core2 2.4ghz con 4 GB de RAM) y es básicamente tener una mac “desperdiciada” junto a la tele LCD , amen de que hay que prenderla a mano y esperar a que arranque, o tenerla en “standby” o dormida en espera, lo que consume electricidad. El poderla reemplazar con un dispositivo pequeño y barato libera una computadora que puede ser utilizada para trabajo o vendida a buen precio.
cuando Apple presentó esta nueva versión de su sistema para consumo de medios casero, lo que mas me llamo la atención fue su precio. $99 por un aparato muy pequeño, negro, bastante parco y solo con las conexiones básicas en la parte trasera, un logotipo de la manzana arriba y un discreto “led” al frente.
Normalmente la funcionalidad del ATV2 es bastante básica, limitada a la tienda de iTunes, y enfocada a consumir contenidos de Apple o de computadoras locales. Este tipo de configuración no va de acuerdo con mi forma de consumir contenidos, por lo que no me interesaba. Hasta que llegó XBMC.
Como he mencionado anteriormente, Plex es una modificación del XBMC (Xbox Media Center) que nació como una “hack” de la primera consola Xbox para convertirla en un “Media Center”. Hoy en día se ha modificado para correr en varias plataformas, y hace poco lo “portaron” a iOS, que funciona en ATV2, iPad e iPhone.
Un amigo me aviso de la disponibilidad de esta aplicación, que requiere tener “jailbreak” o desbloqueo. después de comprobar (con mi amigo como conejillo de indias) que el programa funcionaba muy parecido al Plex, me di a la tarea de conseguir uno, desbloquearlo e instalar XBMC.
El Jailbreak es un poco mas complicado en este aparato pues requiere de una serie de comandos del control remoto (no tiene otro modo de control) y un cable especial (microUSB) que no viene con el equipo. Después de varios intentos quedo listo. Aquí se complica la cosa y no es para el temeroso o precavido: hay que conectarse vía SSH y teclear:
$ ssh root@[la dirección IP de tu ATV2]
root@[la dirección IP de tu ATV2]'s password: ''el password va aquí, debe ser  "alpine" por defecto''

$ apt-get install wget

$ wget -O- http://apt.awkwardtv.org/awkwardtv.pub | apt-key add -

$ echo "deb http://apt.awkwardtv.org/ stable main" > /etc/apt/sources.list.d/awkwardtv.list

$ echo "deb http://mirrors.xbmc.org/apt/atv2 ./" > /etc/apt/sources.list.d/xbmc.list

$ apt-get update

$ apt-get install org.xbmc.xbmc-atv2
Eso es todo. Al reiniciar, en la página principal del Apple TV2, XBMC aparecerá habilitando toda la funcionalidad. De ahí solo es cuestión de configurar los servidores locales o computadoras donde se tienen las películas, series música y fotografías.
Lo interesante es que esto puede hacerse también en el iPhone e iPad (previamente desbloqueado) y convierten al aparato en un visualizador de medios portátil, con todas las bondades de XBMC a la mano. La única inconveniencia es que tiene que estar en una red WiFi, por la cantidad de datos que hay que transmitir, pero una película de alta definición se ve perfectamente.
Al final reemplace mi Mac Mini con Plex por este pequeño artilugio, y aunque sacrifiqué algo de dulzura visual, he recuperado una computadora y tengo arranque instantáneo en un dispositivo que no consume ni la mitad de energía o espacio que el anterior.
como siempre espero sus comentarios.
Posted on March 21, 2011
Lectores de Comic para iPad
 From early age I loved to read. I remember before the age of 10 reading “The Golden Book of Children” hundreds of times, just like the entire collection of Emilio Salgari: Sandokan.
Soon after, I used to read Sunday’s newspaper comic strips, and once a week my father gave me some money to buy at the kiosk a “Tales of Walt Disney” or something similar.
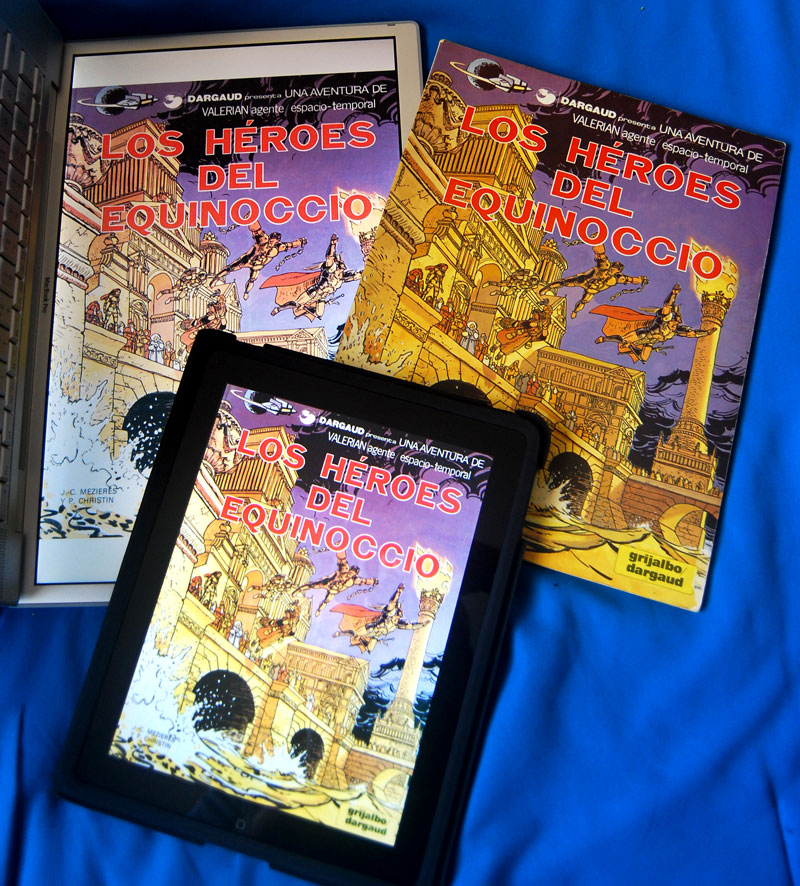
One day – I remember it like it was yesterday – in a supermarket (Comercial Mexicana for compatriots) shopping with my mother found the volume “The ambassador of the shadows” from “Valerian agent spatio-temporal.” I must have had 12 years old.
Since then I have collected all sorts of European comic, particularly in Spanish. I have the entire collection of Valerian, Asterix, Lucky Luke and Blueberry, plus all Moebius books.
The fact is gradually my hobby became a little expensive, since I order from Europe and bought six to ten books per batch from Spain, costing me almost the price of an iPad.
 Then I discovered the Cbr format. Since then i have acquired comics in this format, which is simply a compressed jpeg file. For me (and my pocket) has been a blessing. Now I only buy what I really like, and I can enjoy other titles which are not longer available.
In the beginning I used to read my Cbr’s in a 15′ Mac laptop with Simple Comic which lets you view full-screen, and turn 90 degrees. It reads the keyboard to the left as an open book. The problem is that heated, the fan noise, and heavy.
Also read books and magazines (PDF) becomes a bit heavy and uncomfortable. One day I found on ebay a “Motion Computing” – tablet pc 12 “I bought it.
There was a big difference, but running windows had to use the “feather” (stylus) for all, as was heavy, it was warm and the fan noise. I also had to wait for loading the operating system, the battery lasted two hours, and the screen was not very bright.
Then came the iPad.
When he left the iPad, I like all: “Excellent for Comics!”. The problem is that it is very expensive. At the end I tried it and selling the brick “Motion” could buy it.
The experience of IPAD is the closest thing to read a book. No mouse, pen or pad. The speed of deployment, quality, and ease of use are excellent. No noise, light, immediately turn on and off as well. The battery lasts 10 hours, and I found: on a trip to Paris, we use the iPad on the plane to read, play games and watch movies, and arrived at the hotel with 20% of battery.
I have found new uses in addition to reading, has replaced 70% of my laptop. In the iPad, there are two types of readers: the basics and readers-store. latter as a platform for the electronic sale and offer a good variety.
The most prominent reader-store are Marvel Digital Comics, Comics Panefly Ave! Comics. they offer a free (less Hail! Comics, which costs .99 cents) with a proprietary format that allows reading bullet by bullet. It is very easy to buy and read immediately, but most collections are American and independientes.Solamente Ave! Comics offers European collections, and even in Castilian, but with a very limited selection but the prices are acceptable.
Among the readers. Cbr and cbz comic are Zeal, Cloudreaders, Comic Mobi reader, Comic Viewer, arc reader, Panefly, etc.
The most recommended are Coimc Zeal and Cloudreaders. the latter is free and works great with cbr, cbz and pdf. Zeal comic the other hand has an excellent storage system, which lets you “folders” or collections. It all depends on the style you have, but I post the comics I read and then delete them, so do not require a storage system, but some prefer to keep them all and the second program works very well.
Both programs offer options for brightness, change pages by dragging your finger like a real book, multi-touch to zoom in and move the bullet at will, and quickly scan through a lower bar.
Depending on the format, some comics are readable in size, there are others who come to read the text, something easy to play twice in the desired area to zoom. another feature I like is the power “position” the page a certain size and this remains fixed for the rest. This is practical and can cut many blanks in some formats.
finally, the iPad is the closest thing to perfect reader as to books, magazines and comics, especially the American format, and until they release a version of 15 inches (size of European comic magazines and normal) will remain in my preference.
Hopefully with the arrival of new pills on the market may be competition with powerful and user-friendly programs such as those mentioned above. Android is a platform with a future but also a lot of fragmentation that makes it very acceptable when you have something as solid as the iPad.
I welcome your comments Desde muy joven me ha gustado la lectura, antes de los 10 años recuerdo haber leído “El libro de oro de los niños” cientos de veces, al igual que toda la colección de Emilio Salgari – Sandokan.
Poco después, leía las tiras cómicas del diario dominical, y una vez a la semana mi padre me daba unos pesos para comprar en el quiosco de la esquina un “Cuentos de Walt Disney” o algo parecido.
Un día – lo recuerdo como si fuera ayer – en un supermercado (Comercial Mexicana para los compatriotas) acompañando a mi madre encontré el tomo “El embajador de las sombras” de “Valerian, agente espaciotemporal“. Tendría yo 12 años.
Desde entonces he coleccionado toda clase de comic Europeo, particularmente en español. Tengo desde la colección completa de Valerian, Asterix, Lucky Luke y Blueberry, Hasta libros de Moebius.
El hecho es que poco a poco se fué volviendo un Hobby” un poco costoso, ya que me llegaban catálogos o revistas de Europa y mandaba comprar seis o diez libros a España, que con la transportación me salían lo que un iPad.
Entonces descubrí el .cbr. Desde entonces “bajo” los comics en este formato, que es simplemente un comprimido de archivos .jpg. Para mí (y mi bolsillo) ha sido una bendición. Ahora sólo compro lo que realmente me gusta, y puedo disfrutar de otros que ya no se consiguen.
Al principio, leía mis .cbr’s en una laptop mac de 15″ con un lector “Simple Comic” que permite ver en pantalla completa, y voltear 90 grados. Se lee con el teclado a la izquierda como un libro abierto. El problema es que se calienta, el ventilador hace ruido, y es pesado.
Como también leo libros y revistas (PDF) se vuelve un poco pesado e incómodo. Un día encontré en ebay una “Motion Computing” – tableta pc de 12″ que la compré.
Había una gran diferencia, aunque corriendo windows había que usar “la plumita” (stylus) para todo, igual seguía pesado, se calentaba y seguía el ruido del ventilador. Además tenía que esperar a que cargara el sistema operativo, la batería duraba dos horas, y la pantalla no era muy brillante.
Entonces llegó el iPad.
Cuando salió el iPad, pensé lo mismo que todos: “¡Excelente para Comics!”. El problema es que es muy caro. Al final lo probé y vendiendo el ladrillo de “Motion” pude comprarlo.
La experiencia del iPad es lo más parecido a leer un libro. No hay ratón, pluma o almohadilla táctil. La velocidad de despliegue, calidad, y facilidad de uso son excelentes. No hace ruido, es ligero, prende inmediatamente y se apaga igual. La batería le dura 10 horas, y lo he comprobado: en un viaje a París, usamos el iPad en el avión para leer, jugar y ver películas, y llegamos al hotel con 20% de batería.
le he encontrado nuevos usos aparte de la lectura, Ha sustituido 70% de mi laptop. En el iPad, hay dos tipos de lectores: los básicos y los lectores-tienda. estos últimos sirven de plataforma para la venta electrónica, y ofrecen una buena variedad.
Los más destacados lectores-tienda son Marvel, Digital Comics, Panefly Comics y Ave!Comics. estos ofrecen una aplicación gratuita (menos Ave!Comics, que cuesta .99 centavos) con un formato propietario que permite la lectura viñeta por viñeta. Es muy fácil comprar y leer de inmediato, aunque la mayoría de las colecciones son americanas e independientes.Solamente Ave!Comics ofrece colecciones europeas, y hasta en castellano, pero con una selección muy limitada pero los precios son aceptables.
Dentro de los lectores de .cbr y cbz se encuentran comic Zeal, Cloudreaders, Comic reader Mobi, Comic Viewer, arc reader, Panefly, etc.
Los mas recomendables son Coimc Zeal y Cloudreaders. este ultimo es gratis, y funciona de maravilla con cbr, cbz y pdf. comic Zeal por otro lado tiene un excelente sistema de almacenamiento, que permite guardar en “folders” o colecciones. Todo depende de el estilo que se tenga, pero yo cargo los comics que leo y luego los borro, por eso no requiero un sistema de almacenaje, pero hay quien prefiere guardarlos todos y el segundo programa funciona muy bien.
Ambos programas ofrecen opciones de brillantez, cambio de paginas arrastrando el dedo como en un libro real, multi touch para acercarse y mover la viñeta a placer, y escaneo rápido por medio de una barra inferior.
Dependiendo del formato, algunos comics son legibles en tamaño original, otros hay que acercarse para leer el texto, cosa sencilla al tocar dos veces en el área deseada para acercarse. otra función que me gusta mucho es el poder “posicionar” la página a cierto tamaño y este se queda fijo para las demás. Esto es mu practico y permite cortar los espacios en blanco de algunos formatos.
en fin, el iPad es lo mas cercano al lector perfecto en cuanto a libros, revistas y comics, sobre todo del formato americano, y hasta que no salga una versión de 15 pulgadas (tamaño de comic europeo y revistas normales) seguira siendo de mi preferencia.
Ojala y con el arribo de nuevas tabletas en el mercado pueda existir competencia con programas tan poderosos y amigables como los antes mencionados. Android es una plataforma con mucho futuro pero también mucha fragmentación que lo hace poco aceptable cuando se tiene algo tan solido como el iPad.
Espero sus comentarios
Posted on February 21, 2011
Plex – el mejor "Home Theater"
Uno de mis pasatiempos favoritos es el cine; me permiten relajarme y pasar un buen rato con mi familia. Como en el pasado trabaje para una empresa de audio y video, aprendí mucho sobre “Home Theater” o el negocio de el entretenimiento familiar. Las nuevas tecnologías han hecho que sistemas costosos y complejos sean fáciles de emular usando dispositivos relativamente baratos sabiéndolos configurar.
Para quien no lo sabe, hace algunos años un sistema de entretenimiento en múltiples habitaciones, con controles de audio y video, un servidor central de vídeos o DVDs llegaba a costar alrededor de los $50,000.00 dolares.
Hoy en día ese mismo sistema se puede implementar por menos de $5,000.00 dependiendo de la cantidad de televisores y cuartos a utilizar.
Todo esto viene a colación pues quiero compartir la experiencia que fué instalar un “Home theater” bastante elegante, fácil de usar y con espacio para crecer en el futuro.
Existen muchas soluciones en el mercado, muchas son propietarias, pero yo me inclino mas por las de código abierto por tener muchas mas opciones a un costo bajo o inclusive gratis.
En cuanto a Hardware, las PCs armadas son lo mas barato, pero no lo óptimo por el tamaño y el ruido, lo mismo pasa con el Xbox 360, muy ruidoso y se calienta.Al final de cuentas me decidí por una Mac Mini: el precio es un poco mayor que equipos similares, pero a diferencia de éstos trae de fabrica lector de DVD, control remoto es completamente silenciosa.
En aplicaciones se tienen tres opciones:
Front Row, el programa que viene por defecto en el sistema operativo, es muy limitado y esta pensado para consumir servicios de Apple.
XBMC, (Xbox Media Center) programa de código abierto que se desarrollo al principio basado para la consola Xbox, que ha sido adaptado a todo tipo de sistemas operativos.
Boxee, un “fork” o bifurcación del XBMC que ha tenido mucho éxito y tiene hasta su propio hardware.
Plex. otra bifurcación del XBMC, y para mi la mas elegante de todas, con atributos que pueden llenar la mayoría de las necesidades en un sistema casero.
Plex es una aplicación disponible en OSX, windows, IOS y Android, con una interfase limpia y elegante con un sistema poderoso.
El programa en concreto es un controlador y visualizador de contenidos, como música, películas, series de televisión y fotografías. También dispone de “plugins” que expande las alternativas de visualizar contenidos de Internet, como Hulu, BBC iplayer, TED Talk, Netflix y servicios de música, imágenes y vídeos como Youtube y Vimeo.
 En OSX son 2 programas: el visualizador y el servidor. el servidor es una base de datos con todos los archivos, nombres, afiches y todo lo referente a el video, película o serie de televisión.
Para los archivos de películas y series, las opciones son tener un servidor de archivos o un disco duro externo, ambas funcionan bien, y como yo ya tengo un servidor casero, lo uso para archivar películas y tener respaldo de todas las computadoras en casa.
Plex lee del servidor el álbum de fotos, la colección de música, los vídeos caseros y la colección de películas y series televisivas. De hecho veo muy poca TV: normalmente “bajo” películas compradas en iTunes, o convierto mi archivo de DVDs a ficheros AVI, MKV o ISO para guardarlos en el servidor.
Para convertir DVDs uso un programa muy bueno llamado VisualHub, por desgracia fue descontinuado pero con Handbrake se puede hacer lo mismo.
También llego a bajar series de televisión extranjeras que no se encuentran disponibles en tiendas virtuales por medio de torrentes, aunque la mayoría las ponen en sus sitios web al día siguiente, es solo que es mas practico verlo en formato de vídeo que por medio de un navegador.
En cuanto a musica utilizo Shoutcast, musica en linea de todo el mundo con una variedad inmensa.
En estos días cuando escribía este post, algunos amigos me han señalado el Apple TV 2 (ATV2) que puede ser convertido a un servidor muy parecido al Plex, voy a investigar y vere si puedo reemplazar mi Mac Mini por algo asi.
Mientras tanto, espero comentarios y criticas.
Posted on February 9, 2011
Jugando con OBD-II
 I have always been passionate about technology and I enjoy tremendously open and analyze all I have to understand how it works and try to increase its functionality.
From a young age my father instilled in me a taste for trades such as carpentry and mechanics. Since then used to help you change spark plugs, oil and general maintenance, well, until I got to change drum brakes and disc. Over time, the automotive technology has changed and now cars use computers have replaced many mechanical functions that, in some ways is good, but difficult to diagnose equipment problems as needed “specialized” to read codes generated by these computers.
The OBD-II (On-Board Diagnostic) is a standard created to communicate with the car’s computer – factory-installed after 1996. The OBD-II is a connector that is usually between the wheel and foot controls, and once connected can read, transmit and edit data.
To access these data have to take the car to a mechanic or dealer to have an aid ODB-II reader. They connect to the car and can be diagnosed within a few minutes when the vehicle is the situation. The device is relatively expensive and the codes used are somewhat cryptic, which increases the cost of diagnosis made by the mechanic.
This reminds me when several years ago I was driving my SUV when suddenly all the dash lights came on, and started flashing the sign of “check engine.” Needless to say, I panicked, I immediately pulled over, turned off the car and turned on. The engine sounded good, did not have any noise, smoke or sign of failure, but all the dash lights indicate a fault with the “check engine” light still blinking. I finally called the dealer, who said I could do without a problem and take him the next day. Four days later and $ 350 less I replaced a sensor that was causing the whole mess.
This type of experience is what prompted me to look for a device to read the messages from the computer in my car and have a more clear picture of what’s happening in the motor.
Kiwi WiFi
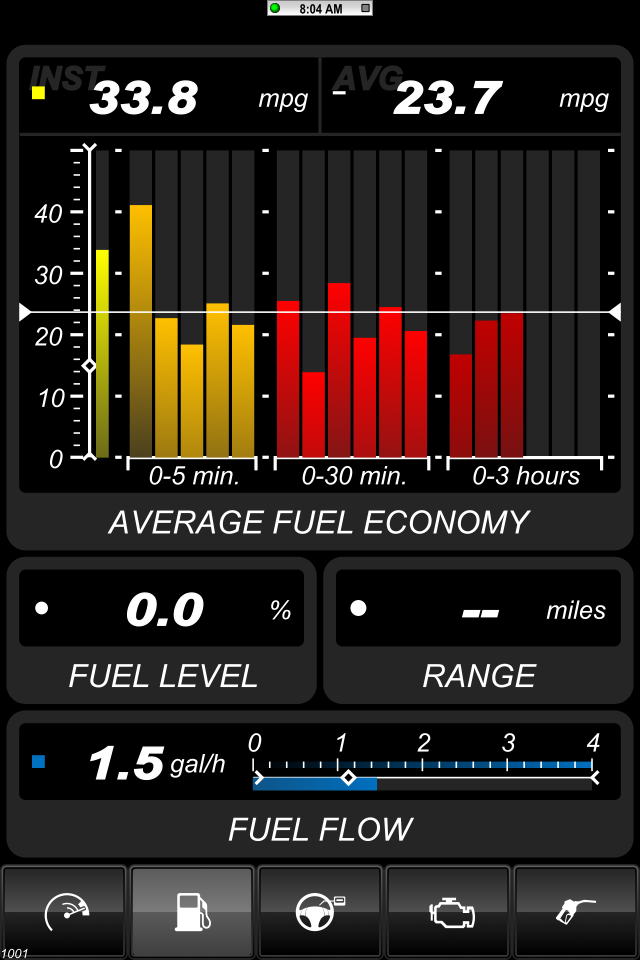
After much searching, I found the PLX Kiwi Wireless Devices, which is a device that connects to the ODB-II and sends the data via WiFi to the iPhone, which is used in conjunction with a program. There are several applications to Windows and iPhone, but convinced me was one called DashCommand. – By the way, have a version for Android.
The apparatus and the program cost less than $ 200 usd and allow reading of data from the car through an instrument panel, such as oil levels, gas, pressure, torque, acceleration, rpm, level, etc.. It also measures the slip or skid, which displays real-time levels of lateral movement, acceleration and G-forces The inclinometer monitoring helps the field level in different types of road and race track creates a visual map of the path with acceleration and braking in order to analyze the changes occurred on the track.
Speed
Inclinometer
Management and Consumer
Fuel Use
Fluids
What I like about this program is the diagnosis, which shows marked errors and their meanings, with the possibility to erase the mistake once read. A couple of times the oxygen sensor has sent me errors, which are important but not on my board listed only as “check engine.”
Occasionally I use Kiwi to monitor some tours, and see the performance of my car. Also use it to check the cars of my family especially when errors appear. The software allows you to separate the results by vehicles, recognizing each by the VIN (Vehicle Identification Number) and storing it in its own database.
One of the things that I like the device is a small switch on the side, this allows off and on at will, so it can be left permanently connected and only activate it when necessary.
Well that’s it’s all for now. I’m sure in a few months will Gadgets and more sophisticated programs that allow control and even modify (tuning) the on-board computer to give better economy, acceleration or whatever. Ford released the Ford SYNC MyFord Touch that allows a little more control over the functions of the car, internet and above all entertaining. Other devices such as Mavia can do all this and more, including GPS tracking, and other online options that have not convinced me, as subscriptions and “geotagging.” In short, the future is very “hackable”. As always, I welcome your comments and suggestions.
Siempre me ha apasionado la tecnología y disfruto de enormemente abrir y analizar todo lo que tengo, para entender cómo funciona y tratar de acrecentar su funcionalidad.
Desde muy joven mi padre me inculcó el gusto a los oficios, como la carpintería y la mecánica. Desde entonces ya solía ayudarlo a cambiar bujías, aceite y mantenimiento en general, vaya, hasta llegué a cambiar frenos de tambor y disco. Con el tiempo la tecnología automotriz ha cambiado y ahora los autos usan computadoras que han substituido muchas funciones mecánicas, esto, en cierto modo es bueno, pero dificulta el diagnóstico de problemas pues se necesitan aparatos “especializados” para leer códigos generados por estas computadoras.
El OBD-II (On-Board Diagnostic) es un estandard, creado para comunicarse con la computadora del auto – instalado de fábrica después de 1996. El OBD-II es un conector que se encuentra normalmente entre el volante y los controles de pie, y una vez conectado permite leer, transmitir y modificar datos.
Para tener acceso a estos datos hay que llevar el auto a un taller mecánico o distribuidor autorizado que tenga un aparato lector de ODB-II. Ellos lo conectan al auto y pueden diagnosticar en pocos minutos en que situación se encuentra el vehículo. El aparato es relativamente costoso y los códigos que usa son un tanto crípticos, cosa que aumenta el costo del diagnóstico hecha por el mecánico.
Esto me recuerda cuando hace varios años atrás iba manejando mi SUV cuando de repente todas las luces del tablero se encendieron, y empezó a parpadear el letrero de “check engine”. Sobra decir que entré en pánico, inmediatamente me estacioné, apagué el auto y volví a encenderlo. El motor sonaba bien, no tenia ningún ruido, humo o señal de falla, pero todas las luces del tablero indicaban una falla, con el “check engine” todavía parpadeando. Al final llamé al concesionario, quienes me dijeron que podía manejarlo sin problema y que lo llevara al siguiente día. Cuatro días después y $350 menos me reemplazaron un sensor que fue el causante de todo el lío.
Este tipo de experiencias es lo que me impulsó a buscar un dispositivo para leer los mensajes de la computadora en mi auto y tener un control más claro de lo que pasa en el motor.

Kiwi WiFi
Después de mucho buscar, encontré el Kiwi Wifi de PLX Devices, que es un dispositivo que se conecta al ODB-II y manda los datos via WiFi al iPhone, el cual se usa en conjunto con un programa. Existen varias aplicaciones para Windows e iPhone, pero el que me convenció fue uno llamado DashCommand. – Por cierto, tienen una versión para Android.
El aparato y el programa cuestan menos de $200 usd y permiten la lectura de los datos del auto por medio de un panel de instrumentos, como por ejemplo niveles de aceite, gasolina, presión, torque, aceleración, revoluciones por minuto, niveles, etc. También mide el patinaje o derrape, que muestra en tiempo real niveles de movimiento lateral, aceleración, y fuerzas G. El inclinómetro ayuda al monitoreo de nivel de terreno en distintos tipos de carretera, y la pista de carreras crea un mapa visual de el camino recorrido con aceleración y frenado para poder analizar los cambios ejercidos en la pista.
 Velocidad |
 Inclinómetro |
 Manejo y Consumo |
 Uso de Combustible |
 Fluidos |
Lo que más me gusta de este programa es la parte de diagnósticos, el cual muestra los errores marcados y su significado, con la posibilidad de borrar el error una vez leído. Un par de veces el sensor de Oxígeno me ha mandado errores, los cuales no son importantes pero que en mi tablero aparecen sólo como “check engine”.
De vez en cuando utilizo el Kiwi para monitorear algunos recorridos, y ver el desempeño de mi auto. Lo uso también para revisar los autos de mi familia sobre todo cuando aparecen los errores. El software permite separar por vehículos los resultados, reconociendo a cada cual por el VIN (Número de Identificación de Vehículo) y guardándolo en su propia base de datos.
Una de las cosas que mas me gustan del dispositivo es un pequeño switch en el costado, este permite apagarlo y prenderlo a voluntad, por lo que se puede dejar conectado permanentemente y solo activarlo cuando es necesario.
Pues ya está, es todo por el momento. Estoy seguro que en unos meses saldrán apartos y programas más sofisticados que permitan controlar e inclusive modificar (tuning) la computadora de a bordo para dar mejor economía, aceleración o lo que sea. Ford sacó el Ford SYNC con MyFord Touch que permite un poco mas de control sobre las funciones del automóvil, internet y sobre todo entretenimiento. Otros dispositivos como Mavia permiten hacer todo esto y más, como localización por GPS, y otras opciones en línea que todavía no me convencen, como suscripciones y “geotagging”. En fin, el futuro viene muy “Hackeable”. Como siempre, espero sus comentarios y sugerencias.
Posted on February 3, 2011
De como renove mi vieja Macbook Pro
 I have had a 2006 Macbook Pro 2,2 for about 5 years now, its a strong, trustful computer which I only had to replace the internal hard drive once. The laptop has the maximum available RAM of 2 GB, 200 GB HD and has an Intel 2.16 Dual core porcessor.
I always try to have up to date OS and software, so with time the system has become slower mostly at startup and loading applications.
At work I have a Macbook Pro i5 with 4 GB RAM, so I can tell the difference on a daily basis, sometimes I think about replacing mine with a new model. The problem is that I don’t walk around with $2k in my pocket, so I have to find creative alternatives to renew my laptop.
After a lot of research, I learn that the main bottleneck is the Hard drive access. Depending on the speed the computer takes to open applications, the user experience can be slower or faster.
Nowadays there are lots of hard drive options, some very fast, but on a laptop a fast hard drive (7,200 to 10,000 RPM) produce a lot of heat, noise and consume more battery.
So at this point I got interested in SSD – Solid State Drives, which act very similar to RAM memory, but work as a hard drive. The advantages of these drives are the read and write speed, the low energy consumption and the fact that there are no moving parts, which makes them also very tough. Did I mentioned the read and write speeds are incredible?
My Mac used to take from 45 to 60 seconds to boot, compared to the i5 that takes 30. The same thing happened at loading applications and files, Photoshop would load in 15 seconds. It may sound ridiculous but when you need to finish a deadline every second counts when you have a file or idea to be worked.
The main problem with SSD is the price, it is very high compared to traditional HD: a 240 GB can cost up to $500. So what should I do? How to balance between capacity and price?
To whoever want to learn more about SSD, Anandtech has an excellent Anthology.
At the end I decided to buy a 120 GB SSD for 2 reasons: it is big enough for the OS plus applications with extra space for Photoshop scratch disk and system caches, and the price is around $200. The big files and applications would stay on my original HD. Now the problem was to either use the original HD as external or replace the internal DVD with a bay that holds the drive. I like that idea, since i barely use the DVD anyway. OWC have an adapter for the new unibody macs, but my mac model requires a special adapter sold by OptiBay, but at the end I bought a compatible one from Ebay a lot cheaper ($20).
 In my research found the best SSD is the Mercury Extreme Pro, from OWC. It is optimized for OSX, uses the SandForce processor that has been rated higher in several tests in different tech sites. the problem is the price is rather high, $250 so I searched for alternatives, and found both the OCZ Vertex 2 and Corsair Force series. They use the same SandForce processor o=-lus the OCZ’s specs are almost identical to the Mercury Extreme.
At the end I bought the OCZ from Amazon at $200. I install it (following this excellent video from OWC) and before replacing the DVD, I installed Snow Leopard on the SSD.
After that I replaced the DVD for the HD and put together the Mac. Awesome! Snow Leopard 10.6.6 starts up in 8 seconds! Photoshop takes 3 seconds and Safari 2 seconds. I couldn’t be happier.
In total my SSD uses 30 GB with OS and Applications, all my files are in the “normal” HD. There are no compatibility problems, hibernation or else. Somewhere I read there were some sleep issues with SSD, but I have not yet experienced any problem. the only other thing I did is follow the guide on this site and disable the “noatime”.
I have tested side by side my Macbook and the i5 , and on startup and opening programs the difference is huge! I’m sure the applications “process” faster on the i5, but I have added at least two years of life to my trusty Mac. All for less than $250.
That’s it. I hope my experience helps to lengthen the lifespan of other Macbooks that still have lots to give, save money on upgrades much needed in this economy. I will be happy to get you comments and suggestions.
Novedad: he instalado un programa que habilita “TRIM” lo que permite a un disco SSD manejar la información mas eficiente y por ende funcionar mas rápido. la liga aquí.
También puedo afirmar que después de un mes de haber actualizado, mi computadora sigue muy rápida, eficiente y puede competir con MacBooks actuales.
Desde hace 5 años tengo una Macbook Pro 2,2, fabricada en el 2006. Es una computadora confiable, fuerte y solo una vez he tenido que cambiarle el disco duro, que murió de repente. Tiene el máximo de RAM que son 2 GB, disco interno de 200 GB y un procesador Intel 2.16 Core duo.
Siempre he procurado tener instalada las última versión del sistema y de los programas que diariamente uso. Poco a poco se ha vuelto lenta, sobre todo al arrancar y abrir programas.
En el trabajo uso una Macbook Pro i5 con 4 GB de memoria por lo que puedo ver la diferencia entre ambas máquinas. Pensaba que tal vez me convendría sustituirla por un modelo nuevo, pero simplemente no traía US$2k en el bolsillo, así que tenía que empezar a buscar otras alternativas y/o soluciones.
Después de varias búsquedas, y leer diferentes artículos, entendí que uno de los cuellos de botella era el acceso al disco duro. Dependiendo de la velocidad de este al abrir aplicaciones y leer archivos hace mas rápida o mas lenta la experiencia.
Hoy en día existen muchas opciones de discos, algunos por cierto son bastante rápidos, pero al ser considerar que es para una laptop, los que son mas rápidos (7,200 a 10,000 revoluciones) producen mucho calor, ruido y requieren de más batería.
Aquí es donde me interesaron los SSD – Discos de Estado Sólido, los cuales son muy parecidos a la memoria RAM, pero que funcionan como un disco duro. Las ventajas de estos son la velocidad de acceso, el poco consumo de energía, y el hecho de no tener piezas móviles, lo que los hacen muy resistentes. De nuevo, las velocidades de lectura y escritura son increíbles.
Mi Mac tomaba de 45 a 60 segundos en arrancar, cuando la i5 toma como 30. Lo mismo pasaba al correr aplicaciones, Photoshop arrancaba en 15 segundos. Tal vez suene exagerado pero cuando necesitas terminar un proyecto cada segundo cuenta, y sobre todo si tienes una idea o archivo que te urge trabajar.
El problema es que los precios son todavía altos, en comparación con los discos duros normales. Un disco de 240 GB costaba casi US$500. Nuevamente surgía la pregunta ¿Que hago? ¿Como puedo obtener un balance entre capacidad y precio?
Para quien le interese aprender a fondo sobre SSD, Anandtech tiene una excelente Antología.
Al final decidí comprar un disco de 120GB por 2 razones: es suficientemente grande para instalar el sistema y algunas aplicaciones, con espacio para uso de el mismo sistema y Photoshop como “scratch” o cache, y el precio estaba alrededor de los US$200. Los archivos y aplicaciones “pesadas” las dejaría en el disco original. El problema era que tendría que convertirlo en externo, pero había otra opción: OWC y otras empresas ofrecen un adaptador que permite reemplazar el DVD interno por un disco duro, y como casi no uso el DVD, me gusto la idea. Para las nuevas Macbooks OWC tiene el adaptador, pero para mi modelo, requerí de un adaptador especial. OptiBay lo vende, aunque al final lo compre en Ebay por mucho menos ($20).
El mejor disco en mi investigación fue el Mercury Extreme Pro, de OWC. este esta optimizado para OSX, utiliza el procesador SandForce y es el que mejor ha salido en distintas pruebas de sitios tecnológicos. Sin embargo el precio es alto; US $250 por lo que me puse a buscar alternativas, encontrando el OCZ Vertex 2 y el Corsair Force series. Ambos utilizan el mismo procesador SandForce y el OCZ es idéntico en especificaciones al Mercury.
Al final me decidí por OCZ, conseguí uno en descuento por Amazon, y procedí a la instalación (OWC tiene muy buenos videos de cómo hacerlo). Antes de reemplazar el DVD, hice una instalación nueva de Snow Leopard en el SSD.
Después reemplacé el DVD por el disco interno y armé la Mac. ¡Increíble! ¡Snow Leopard 10.6.6 arranca en 8 segundos! Photoshop tarde 3 segundos, y Safari 2 segundos. No puedo estar más feliz.
En total mi disco usa 30 GB con programas, los archivos los guardo en el segundo disco, y no tengo ningún problema de compatibilidad, hibernación, ni del sistema. Había leído que hubo problemas en “dormir” OSX con SSD, pero no me ha pasado, lo único que hice fue seguir los consejos de un sitio y deshabilité el “noatime“.
He puesto las MacBook lado a lado con la i5, y en arranque y abrir aplicaciones ¡hay una diferencia abismal! Estoy seguro que las aplicaciones “procesan” mas rápido en la i5, pero se que por lo menos en 2 años no voy a necesitar reemplazar mi confiable Mac. Todo por menos de $250USD.
Eso es todo. Espero que mi experiencia sirva para alargar la vida a muchas computadoras que todavía tienen mucho que dar, ahorrar en actualizaciones sobre todo en los tiempos que corren. Espero sus comentarios y sugerencias.