
Posted on April 28, 2019
Installing the Apple IIgs emulator to Raspberry Pi.
I’m writing this guide to keep some records on how to install the GSPlus emulator on a Raspberry Pi Zero W. It’s intended for the general user with little linux knowledge. It was performed in MacOSX using Terminal and Transmit FTP client.
We assume you already have a Raspberry Pi Zero W, a 32GB SD card, A computer, internet access and a local WiFi network. The RasPi Zero is connected to power, monitor and keyboard.
First, on your computer, get the Retropie SD image latest version.
Write the image to the SD card, I use a program called Apple -PI Baker, which prepares the card and writes a proper format image.
Insert the SD card to the Raspberry Pi and turn it on.
When starts up, wait until “EmulationStation” starts and asks for an input device. Press F4 to stop and go to terminal.
Here we need to configure some things, so type:
sudo raspi-config
Select Advanced Options > Expand Filesystem. Run it.
Select Network Options > WiFi. Select your country, add your local WiFi network and password.
Select Boot Options > command line with auto-login
Select Interfacing Options > SSH. Enable it.
Exit and reboot (sudo reboot)
Optional: to Stop EmulationStation to start automatically every time, we can disable it:
sudo ~/RetroPie-Setup/retropie_setup.sh
Select Configuration / Tools > autostart
Select Manually edit and delete all. We will come back later to add the new emulator.
Get back to terminal (F4 from EmulationStation)
Update system
Let’s get the latest updates and upgrade to Stretch
 sudo apt-get update
 sudo apt-get upgrade
 sudo apt-get dist-upgrade
Modify Release
For upgrading to the new Raspbian version, the package lists must be adapted to the “Stretch” release. To do this, only the word “jessie” has to be replaced by “stretch”. In order not to overlook any position, we simply let the replacement be done by the following command:
sudo sed -i /deb/s/jessie/stretch/g /etc/apt/sources.list
sudo sed -i /deb/s/jessie/stretch/g /etc/apt/sources.list.d/*.list
Update package lists
The new package lists must then be updated and imported:
sudo apt-get update
Update to “Stretch“
Now we are ready to start the upgrade:
sudo apt-get upgrade
sudo apt-get dist-upgrad
The upgrade process is carried out in two steps: First of all, there is a minimal upgrade to avoid conflicts and then a complete upgrade. The upgrade may take a while depending on your Internet connection. A certain amount of attention is required during the update process, as some configuration files are also updated. Therefore, Raspbian asks several times if you want to replace certain configuration files with a new one. If you have made changes to individual configuration files yourself in the past, you should press D (display differences) or N (not replace) depending on the file, otherwise Y (to replace the old configuration file with a new one).
Clean up installation
Old, unnecessary packages are removed after the system update with the following commands:
sudo apt-get autoremove
sudo apt-get autoclean
Finally the Raspberry Pi has to be restarted.
Install GSPlus:
In terminal, type:
git clone https://github.com/RetroPie/RetroPie-Setup
cd RetroPie-Setup
sudo ./retropie_packages.sh sdl2
sudo apt-get update -y
sudo apt-get install -y libpcap0.8-dev libsdl2-image-dev
git clone https://github.com/digarok/gsplus.git
cd gsplus/src
ln -s vars_rpilinux_sdl2 vars
make
We can test the emulator by typing:
Sudo ./gsplus/gsplus
You will get a screen full of “@”. At this point the emulator is ready, we just need to configure it. Press F4.
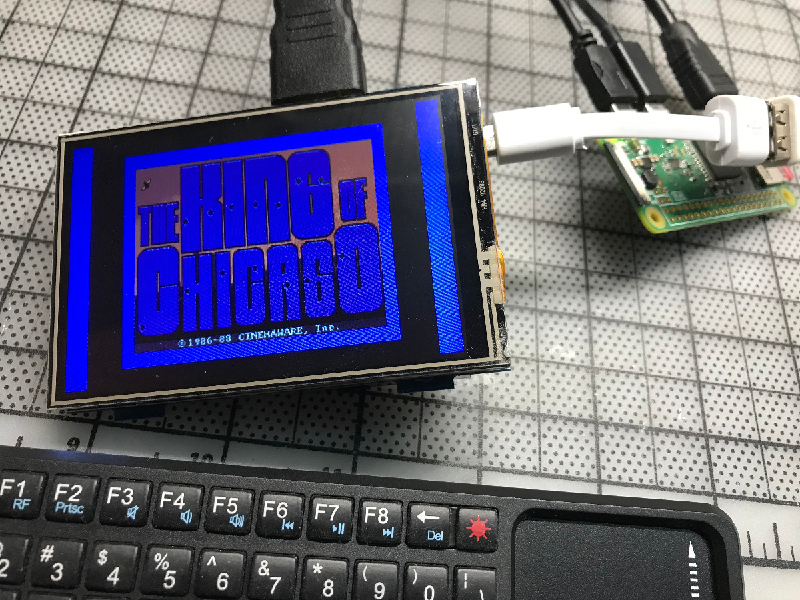
On your computer, go to Alex Lee’s Great site What’s the apple IIgs and download a ROM3 image, plus a Boot image like the ‘System 6.0.4 Hard Drive Image‘
Decompress both and using the FTP program, transfer them to the Raspberry Pi, in the /home/pi/gsplus/ directory.
Back to the terminal, select the ROM File selection and choose the Apple IIGS ROM, then go to Disk configuration and select the System 6.0.4 Hard Drive Image as s7s1.
Save changes to configuration file and exit.
Hiding the boot text
On the terminal, type
sudo nano /boot/cmdline.txt
A quick summary of the options:
logo.nologo: turns off raspberry(s) at boot
quiet: hide messages
console=tty3: hide more messages (redirect boot messages to the third console)
loglevel=3: hide even more messages (disable non-critical kernel log messages) (Included with default RetroPie image)
vt.global_cursor_default=0: hide blinking cursor
plymouth.enable=0: disable plymouth boot text (Included with default RetroPie Image)
If using a plymouth bootsplash:
plymouth.ignore-serial-consoles: ignore serial consoles
plymouth.enable=0: remove to enable plymouth boot text
splash: enable plymouth splash
You can add the any of the options to the end of the cmdline.txt file make sure it is all on the same line or else it will break your boot sequence!!!
/boot/config.txt
disable_splash=1: Disable large rainbow screen on initial boot
avoid_warnings=1: will disable warnings
Hide login text:
touch ~/.hushlogin
Hide/modify message of the day (superseded by .hushlogin if used):
nano /etc/motd
Hide Autologin Text:
sudo nano /etc/systemd/system/autologin@.service
change
ExecStart=-/sbin/agetty --autologin pi --noclear %I $TERM
to
ExecStart=-/sbin/agetty --skip-login --noclear --noissue --login-options "-f pi" %I $TERM
Automatic start of emulator at boot
To start automatically the emulator after boot, go back to retropie config:
sudo ~/RetroPie-Setup/retropie_setup.sh
Select Configuration / Tools > autostart
Select Manually edit and delete all. We will come back later to add the new emulator. Add the line:
/home/pi/gsplus/gsplus -fullscreen -scanline 30 -arate 22050 -novsyn
tab to ok and exit config.
Optional: Add audio and video drivers.
If you are using the 2.8 zero screen, most likely will need USB audio as the other options will not work.
sudo apt-get install pulseaudio
cd ~/git clone https://github.com/tianyoujian/MZDPI.gitcd MZDPI/vgasudo chmod +x mzdpi-vga-autoinstall-onlinesudo ./mzdpi-vga-autoinstall-onlinesudo reboot
Recent Comments